Previously
In the previous article, we looked at the process of React Compiler transforming AST into HIR.
HIR (High-level Intermediate Representation) was an intermediate representation that transformed AST using CFG (Control Flow Graph).
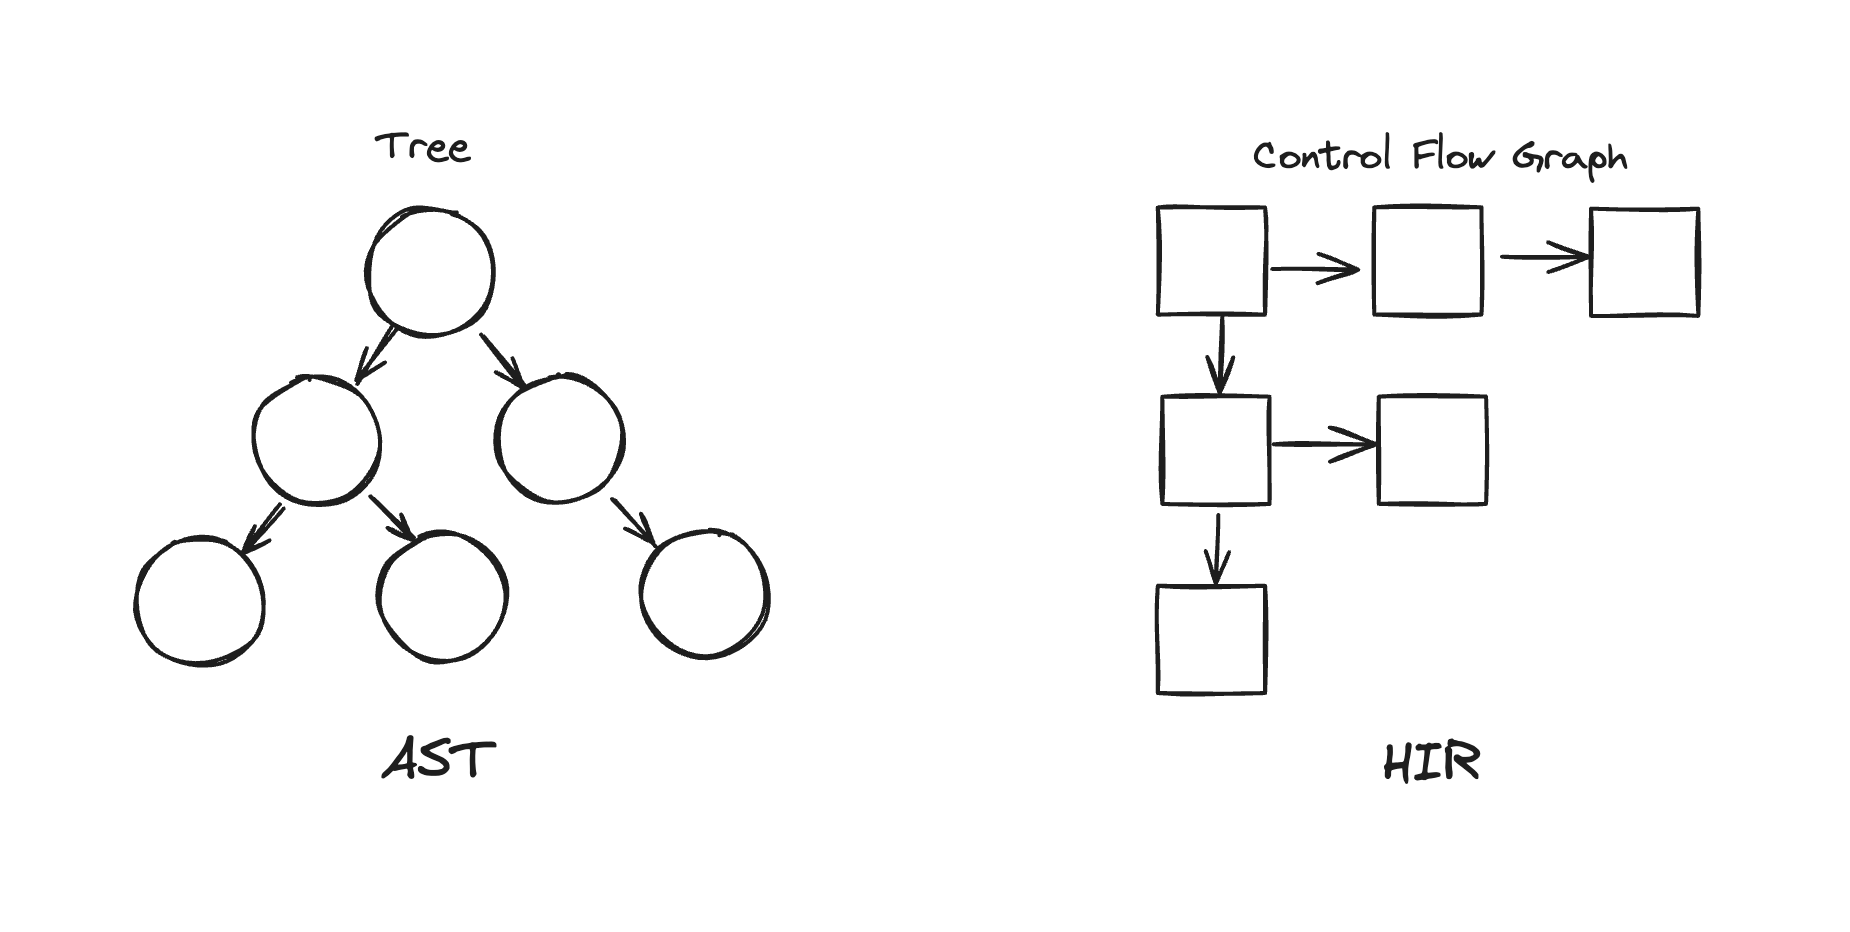
So HIR can show the overall flow of the code through blocks and control flow.
What’s Next?
However, for more detailed optimization, the basic form of HIR alone is not enough.
What more do we need?
Let’s look at the process of constant propagation, which is one of the optimization processes.
Constant propagation is an optimization technique that replaces a variable with a constant when a constant is assigned to that variable.
Simply put, it’s about pre-assigning things that can be assigned in advance.
Let’s take an example.
x = 5
y = x + 2
x = 10
z = x + y
Let’s assume we have this code. (In reality, it would be transformed into HIR form, right?)
Here we use a concept called def-use chain.
def-use chain refers to the relationship between variable assignment (def) and use.
The first assignment (def) of x, x = 5, is used (use) in y = x + 2, but doesn’t affect z = x + y.
And the second assignment of x, x = 10, is used in z = x + y.
We can see that the value of x used in y = x + 2 is different from the value of x used in z = x + y.
To track these complex relationships, we need a more detailed analysis of data flow.
That’s why we need the process of transforming HIR into SSA.
When transformed, it becomes like this:
x1 = 5
y1 = x1 + 2
x2 = 10
z1 = x2 + y1
Oh! Indices have been added to the variables. x has been split into x1 and x2.
With this transformation, it becomes much easier to track the def-use chain. We can know which x we’re using.
Now we can say more confidently that y is 7 and z is 17, right?
This optimization of replacing substitutable variables is called constant propagation.
And we could quickly see how this work can be done easily through the SSA form.
In this article, we’ll look at the process of transforming HIR into SSA.
First, we should know what SSA is, right?
Wait! Constant propagation can be known without SSA transformation. In this case, we can use the reaching definition analysis method. Interested readers can read this, but feel free to skip to the next section.
SSA (Static Single Assignment)
SSA stands for Static Single Assignment, which is one of the intermediate representations used for optimization.
SSA has the characteristic of restricting variables to be assigned only once.
As we saw in the simple example above, this helps to make it easier to track the def-use chain.
Let’s look at the example again.
x = 5
y = x + 2
x = 10
z = x + y
We transformed these x, y, z variables that are defined and assigned multiple times like this:
x1 = 5
y1 = x1 + 2
x2 = 10
z1 = x2 + y1
We transformed it to give one definition at a time to each variable, making the def-use chain simpler.
This lightens the load of each variable and makes it a bit easier to understand the flow of data.
It’s pretty simple, isn’t it? 🤓
Then how can we transform this case?
if(condition){
  x = 5
} else {
  x = 10
}
y = x + 2
Hmm, it’s just a few lines of code, but let’s transform it right away.
if(condition){
  x1 = 5
} else {
  x2 = 10
}
// ...
We’ve successfully changed to a new variable every time we encounter a new x.
We’ve transformed smoothly up to this point, but we hit a snag in the next line.
y1 = x + 2 // 🤔 We can change y to y1... but what should we change x to?x should be determined according to the condition, but we don’t know how to indicate which x goes in.
The above case is where x can have different values depending on the condition of the if-else statement.
We can’t know which x is used in y = x + 2. We can’t easily put in x like in the previous example when we encounter a conditional statement.
Let’s take a sneak peek at the solution first.
When transformed into SSA, it becomes like this:
if(condition){
  x1 = 5
} else {
  x2 = 10
}
x3 = φ(x1, x2)
y1 = x3 + 2
A function called φ (hereafter ‘phi’) has appeared.
phi is a function that combines variables that can have different values due to branches like if-else statements.
With this, we create a new variable x3, and through the φ function, we select either x1 or x2 depending on the condition of the if-else statement.
In other words, the role of the φ function can be expressed as a function that merges branches.
It looks like it’s merging the x in two parallel universes divided by choice, like in a time travel movie.

The main concepts of SSA can be summarized as follows:
- Single definition of each variable:
- In SSA form, each variable is defined only once in the program. That is, the same variable name is not defined multiple times. To do this, a new name (e.g., x1, x2, x3) is given each time a variable is defined.
- φ (phi) function:
- At points where control flow merges, φ (phi) functions are used to merge multiple definitions into one. The φ function selects different values depending on which path of the control flow was reached.
Now we can easily understand semantically where to place the phi function.
We can summarize it as ‘Place it at the appropriate branch merge point.‘
But if we had to express this logically, how should we do it?
SSA Transformation Algorithm
The core of the SSA transformation algorithm is deciding where to place phi functions.
Looking at the commits, we can see that React Compiler is using the algorithm from the following paper (Simple and Efficient Construction of Static Single Assignment Form).
Add SSA-ify pass · react/react@379251c
The algorithm is described in detail here: https://pp.info.uni-karlsruhe.de/uploads/publikationen/braun13cc.pdf Note that the SSA form generated is not minimal. A follow on RedundantPhiElimina...
https://github.com/facebook/react/commit/379251c65f39039ace1d2e5a80bdb5938cf3427c// commit message
The algorithm is described in detail here:
https://pp.info.uni-karlsruhe.de/uploads/publikationen/braun13cc.pdf
// The link was incorrect, so I replaced it.
Note that the SSA form generated is not minimal. A follow on
RedundantPhiElimination pass
is required to prune the graph.Simple and Efficient Construction of Static Single Assignment Form
Matthias Braun1, Sebastian Buchwald1, Sebastian Hack2, Roland Leißa2, Christoph Mallon2, and Andreas Zwinkau
https://pp.ipd.kit.edu/uploads/publikationen/braun13cc.pdfThis paper proposes an improved version of Cytron et al.’s algorithm.
It claims to be simpler and more efficient than the existing algorithm.
To appreciate these advantages, it would be good to look at Cytron’s algorithm first, wouldn’t it? (You can also skip directly to the next chapter.)
Cytron’s Algorithm
Efficiently Computing Static Single Assignment form and the Control Dependence Graph for ACM TOPLAS
Efficiently Computing Static Single Assignment form and the Control Dependence Graph for ACM TOPLAS by Ron Cytron et al.
https://research.ibm.com/publications/efficiently-computing-static-single-assignment-form-and-the-control-dependence-graphThis paper is one of the algorithms for generating SSA, published by IBM Research in 1991.
The main concepts are Dominator Tree and Dominator Frontier.
- Constructing Dominator Tree: Construct a tree representing the domination relationship between each node in the program’s control flow graph (CFG).
- Calculating Dominance Frontier: Calculate the dominance frontier for each node. The dominance frontier is the set of closest descendant nodes that are not directly dominated by the node.
We were curious about where to place phi functions, right? Let’s explore the paper with that as our goal.
This algorithm first performs analysis of the entire tree. Through this, it constructs the dominator tree and calculates the dominance frontier.
And through this, it decides where to place phi functions.
Dominator Tree
First, what is a Dominator Tree?
Here, dominance, node A dominates node B means that all paths to B must pass through A.
Also, it’s assumed that every node dominates itself.
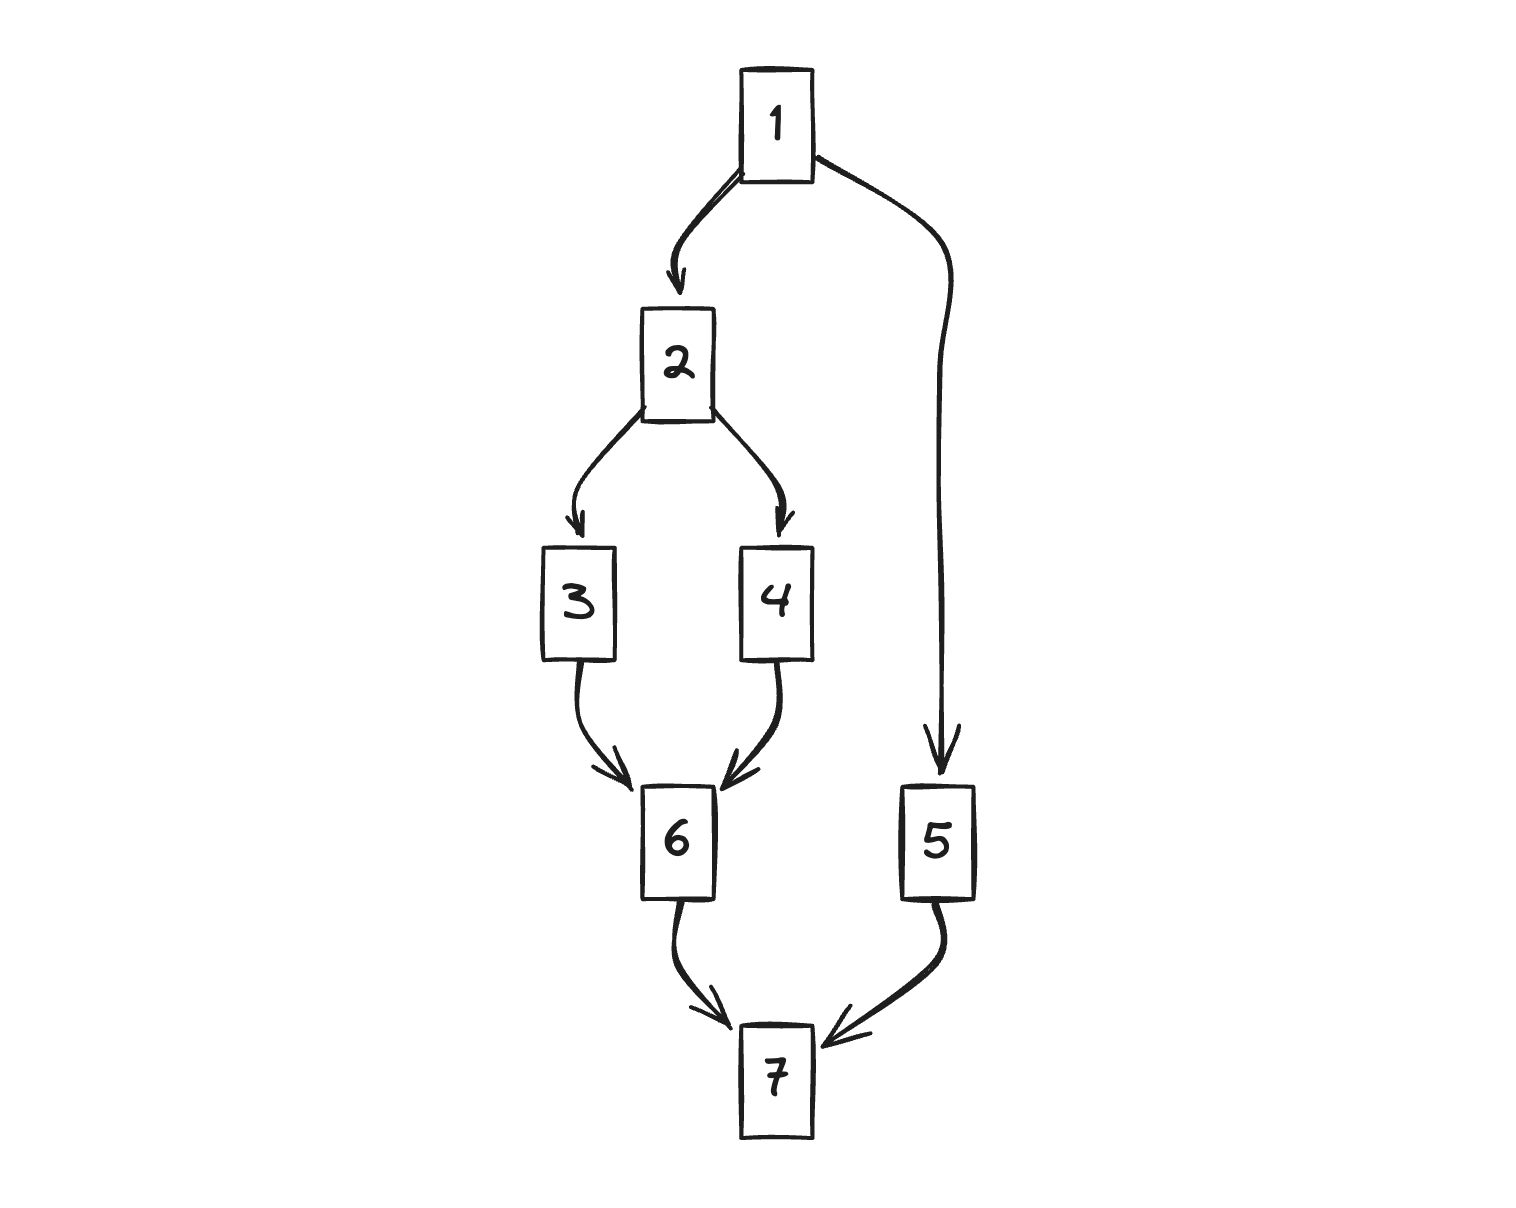
Let’s assume we have this kind of CFG (in our case, it would be HIR, right?) and examine the domination relationship.
- 2 and 5 must pass through 1. Therefore, 1 dominates 2 and 5.
- 3 and 4 must necessarily pass through 1 and 2. However, in domination relationships, we’ll consider only the closest dominator. Therefore, 2 dominates 3.
- In the case of 6, although 3 and 4 are parents, they don’t necessarily have to be passed through. If we look one step up, 2 must be passed through. Therefore, 2 dominates 6.
- The case of 7 is the same, it can come through 6 and 5. Therefore, if we follow each route all the way up, we can see that 1 must be passed through. Therefore, 1 dominates 7.
If we express this relationship as a tree (dominator tree) again, it looks like this:
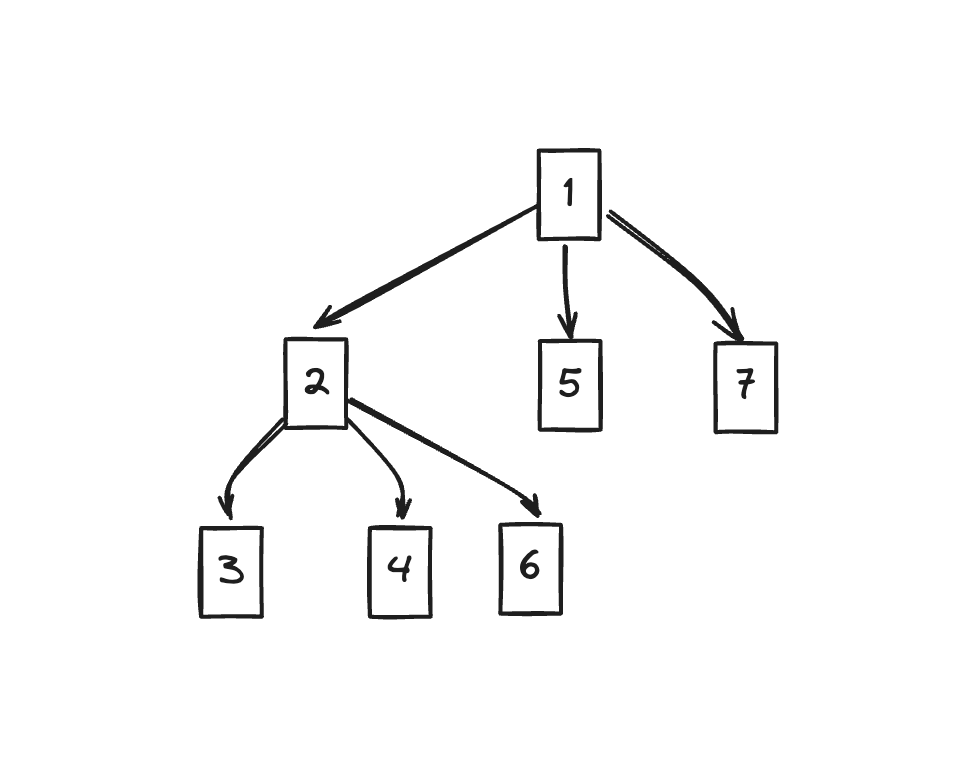
You can see it’s expressed according to the domination relationship we looked at above, right?
At first glance, it looks similar to the original CFG, but it shows a slightly different appearance.
Because it must be passed through, we can see that nodes with large branches are dominated by the node before the branch. (7 is representative)
Dominance Frontier
Next, we calculate the Dominance Frontier (DF).
The Dominance Frontier (DF) of node N is defined as follows:
- The set of CFG nodes that N does not directly dominate, but are dominated by nodes that N directly dominates Intuitively, DF(N) can be thought of as the point where N’s domination ends.
What does this mean? 😥 It’s not immediately understandable.
Let’s look at the process of finding the DF of 2 and 5 together with a diagram.
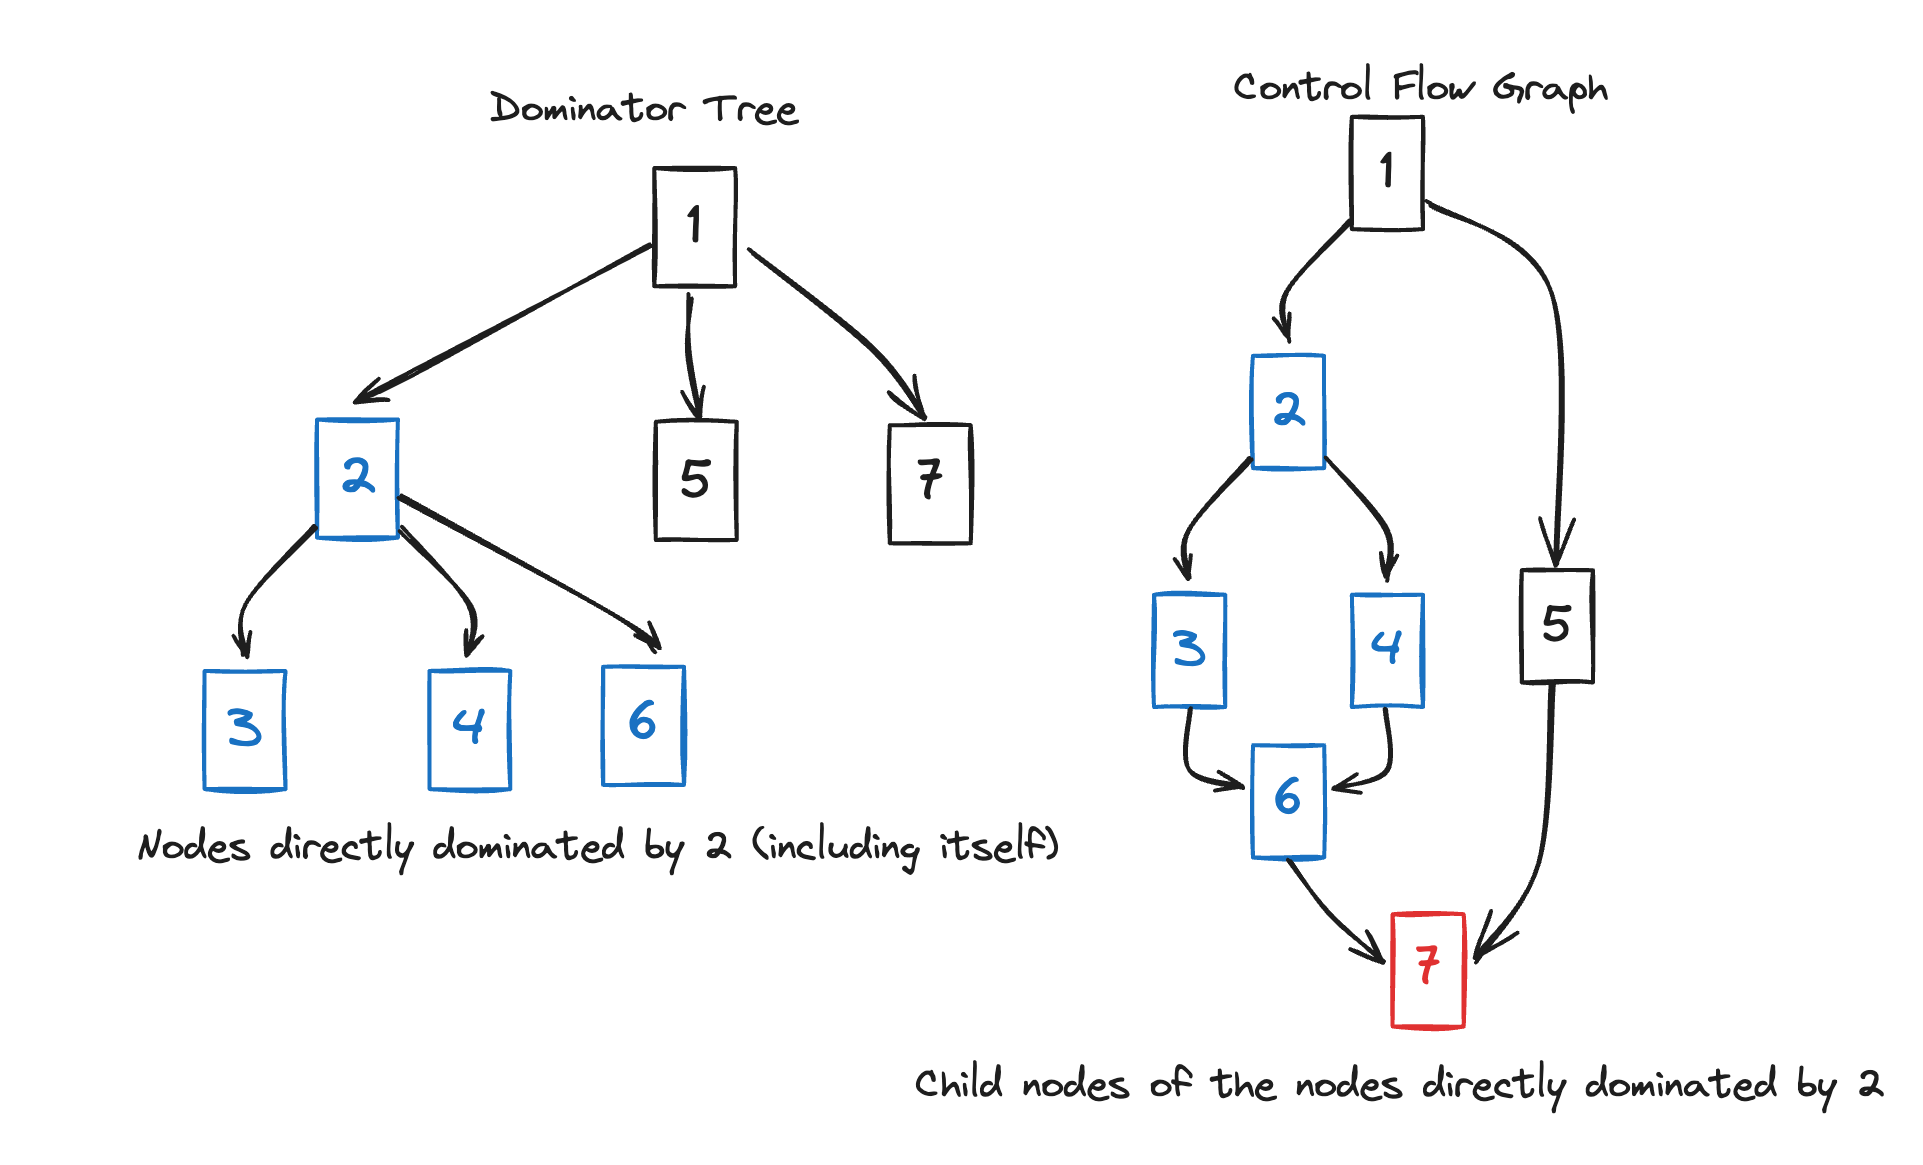
In the case of 2, it dominates 3,4,6 and 2 (itself).
If we look for nodes that 2 does not dominate among the children of the nodes it’s dominating 2, 3, 4, 6, we can find 7, which is a child of 6.
Therefore, DF(2) is 7.
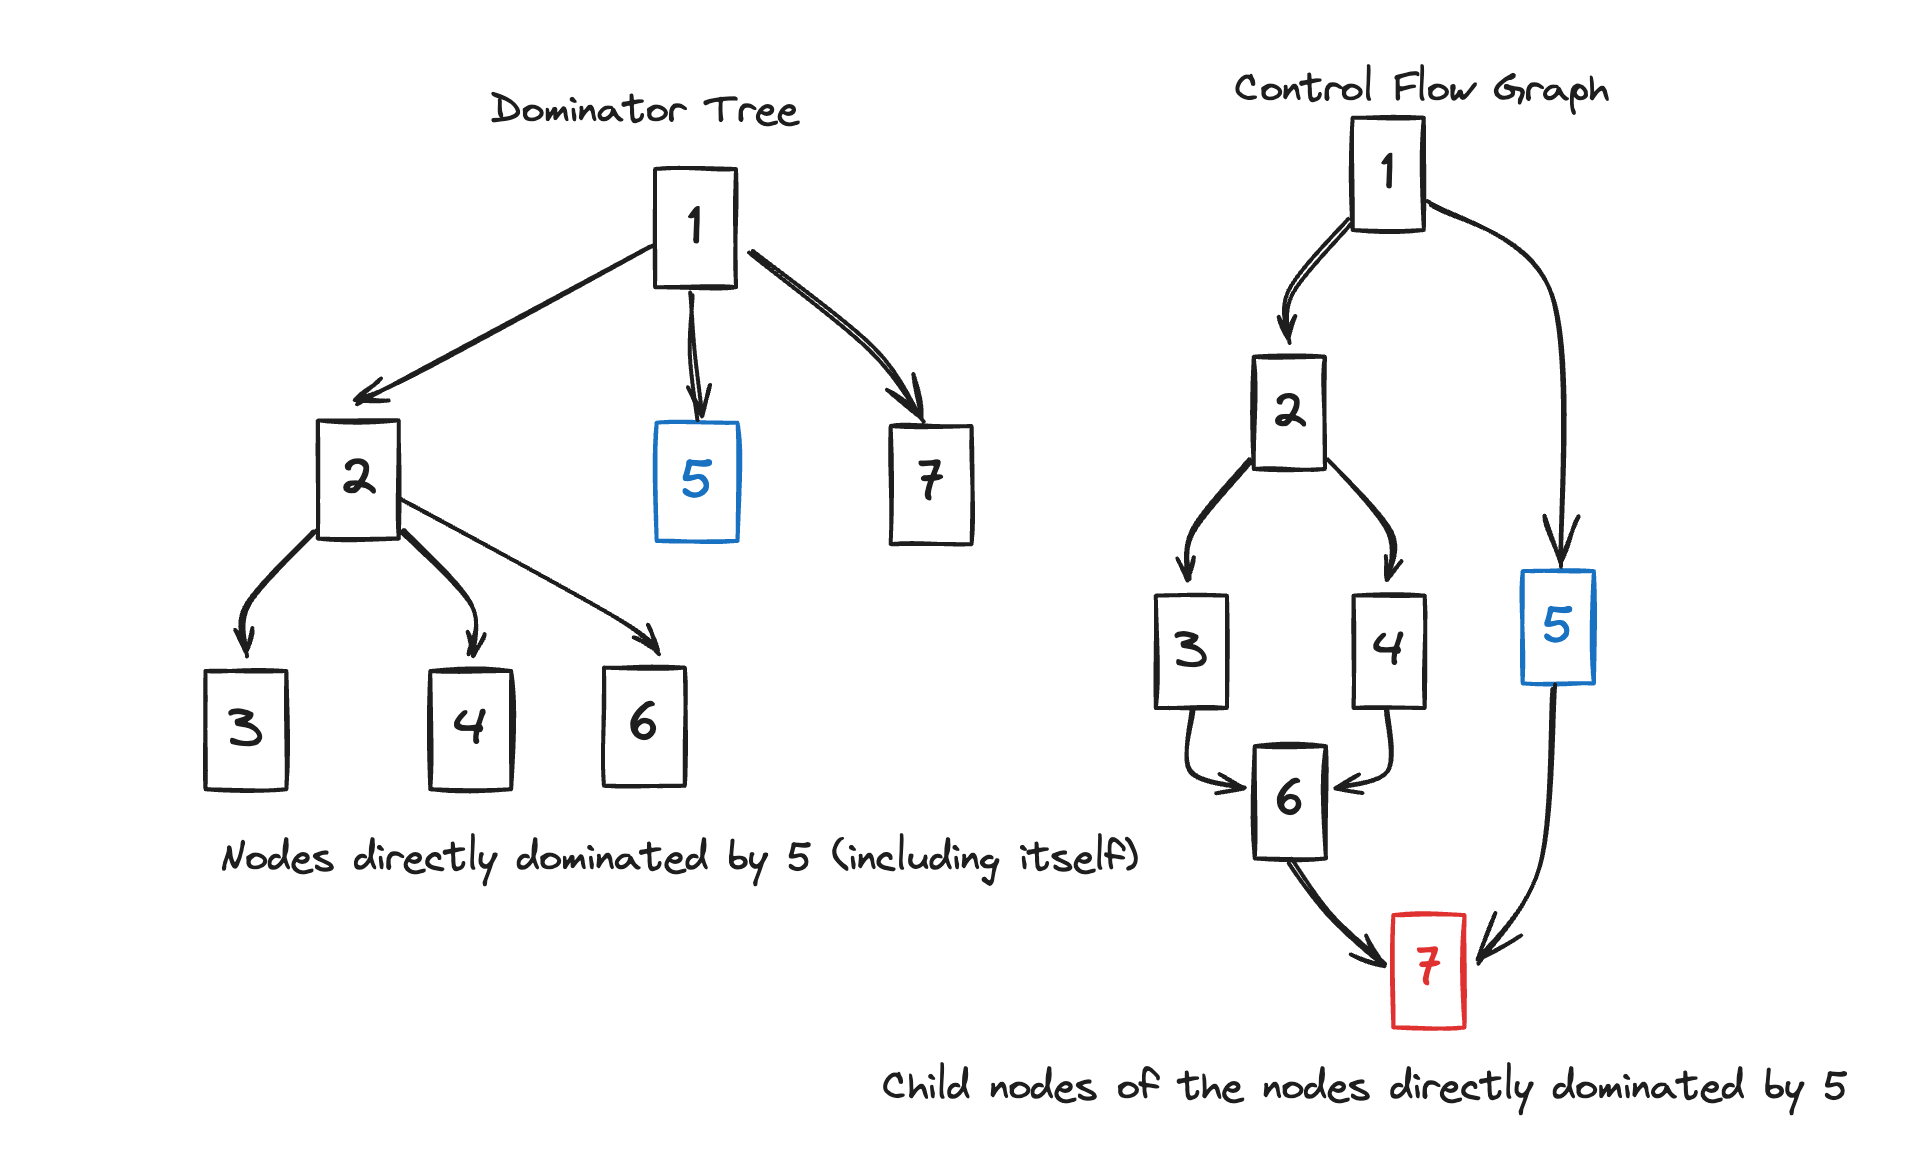
In the case of 5, looking at the dominator tree, there’s only itself.
The node that 5 does not dominate in the CFG is its child 7.
Therefore, DF(5) is 7.
This is how we calculate the dominance frontier. If we look at all cases, it’s as follows:
DF(1) = {} // 1 is the root node, so it doesn't have a DF
DF(2) = {7}
DF(3) = {6}
DF(4) = {6}
DF(5) = {7}
DF(6) = {7}
DF(7) = {}
This is how we can find DFs.
We place phi functions at the nodes in the DF.
Hmm, it might not feel completely clear yet. It looks like we’re just playing with graphs.
Then let’s analyze the meaning from the definition of dominance frontier.
DF(X) = Y, let’s look at the meaning that Y is the dominance frontier of X. Y can be seen as the point where X’s domination ends.
- According to the definition of DF, Y is a child node of a node that X dominates. This means that there is a path from X to Y.
- According to the definition of DF, Y is not in a direct domination relationship with X. This means that the path to Y does not necessarily pass through X.
Summing up, Y can be reached through X, but can also be reached through other paths.
This means that Y can be reached through at least two paths.
In other words, it means that it’s a point where branches merge.
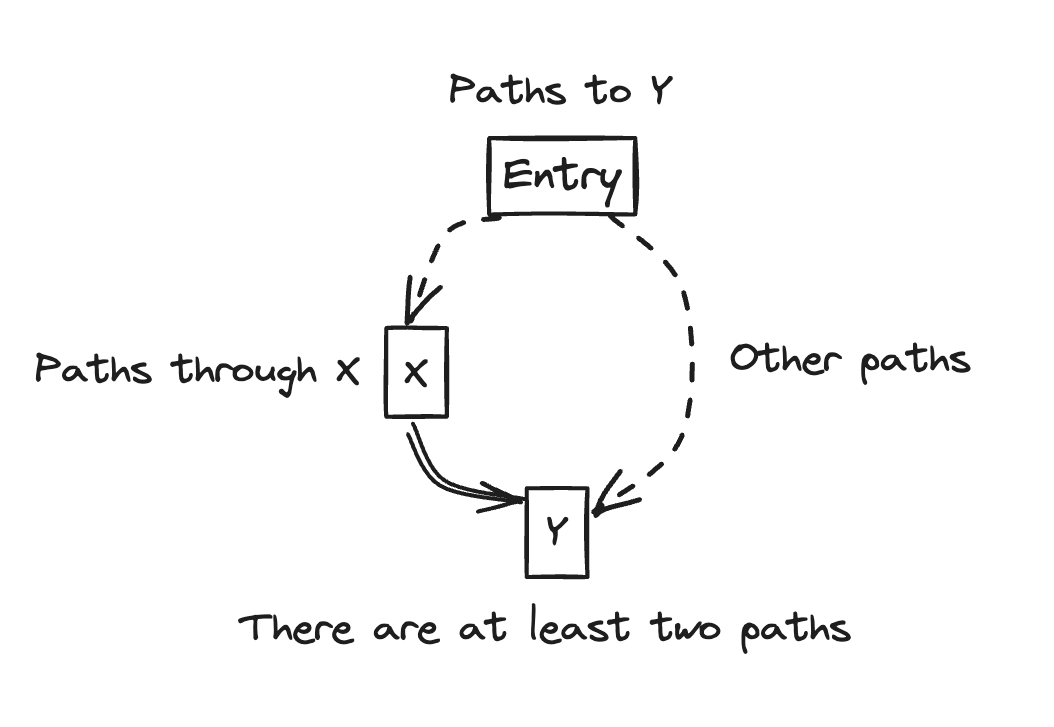
Therefore, we place phi functions at the point where branches merge, that is, at the dominance frontier DF.
Now that we roughly understand, let’s look at the code.
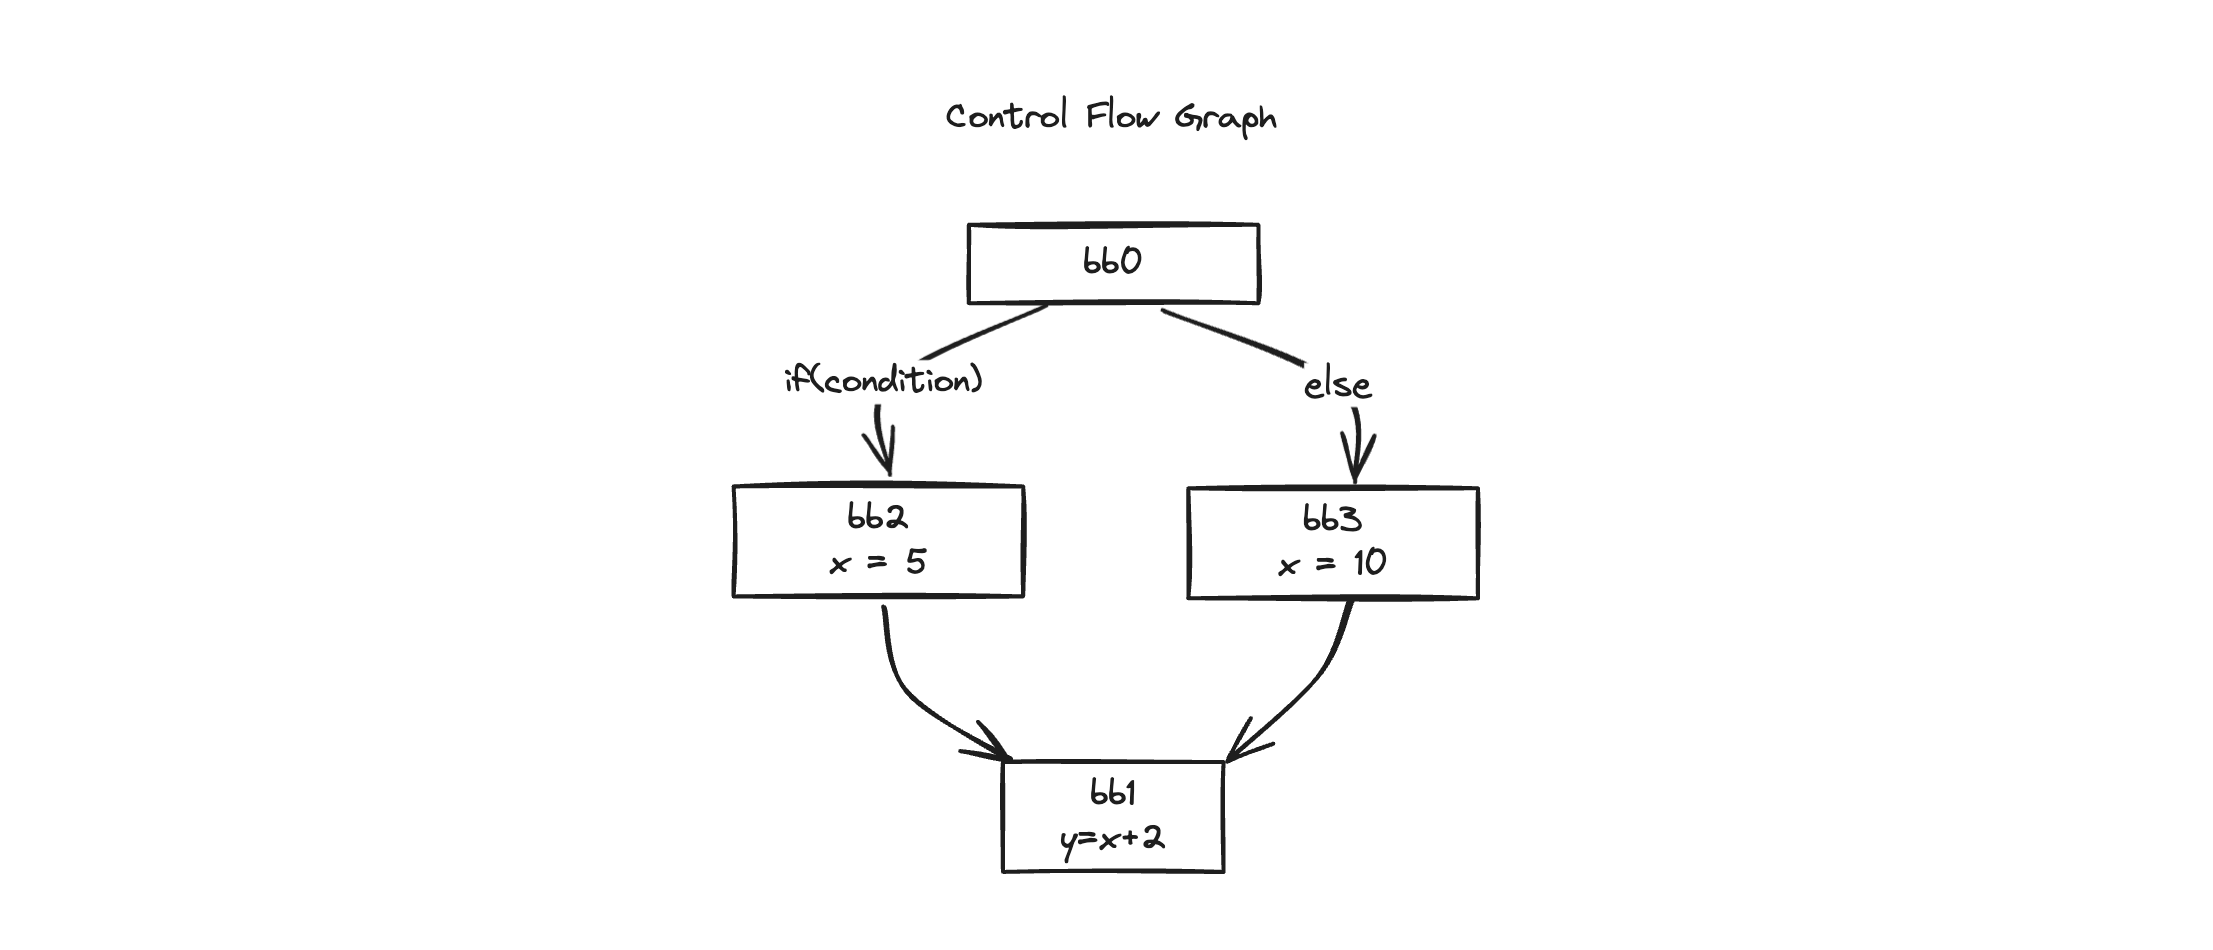
Let’s express the example code we saw earlier as a graph.
if(condition){
  x = 5
} else {
  x = 10
}
y = x + 2
Let’s first express it in HIR form simply
bb0:
  if (condition) goto bb2 else goto bb3
bb2:
  x = 5
  goto bb1
bb3:
  x = 10
  goto bb1
bb1:
  y = x + 2
bb0, bb1, bb2, bb3, it’s divided into 4 blocks, and if we draw the CFG and DT graphs, it will look like this:
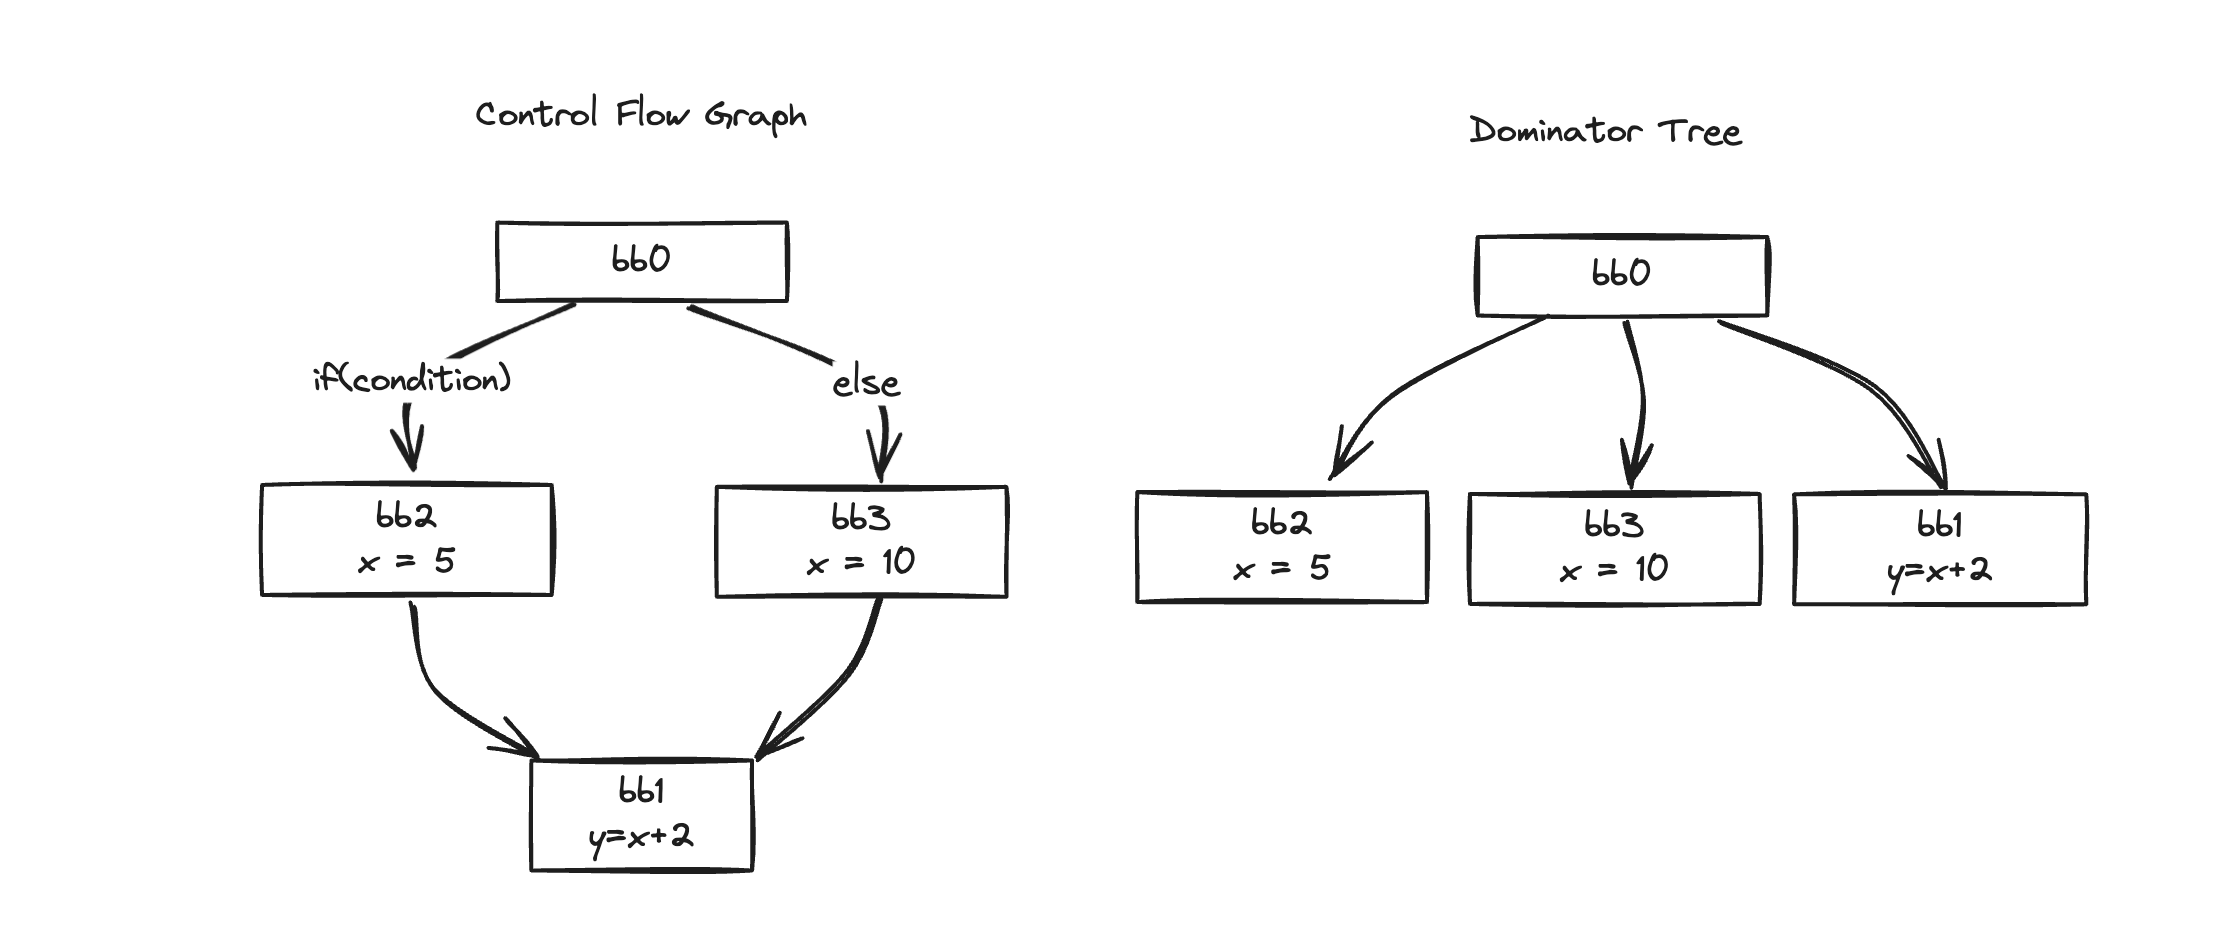
Then let’s find the DF for each:
DF(bb0) = {}
DF(bb2) = {bb1}
DF(bb3) = {bb1}
DF(bb1) = {}
Looking at the DFs, there’s only one bb1! 🥳
Then we place the phi function in bb1.
As we transformed earlier, the phi function is placed in the block where y = x + 2 is.
It’s quite simple, isn’t it? 😊
Cytron’s algorithm places phi functions in this way through dominator trees and dominance frontiers.
However, to execute this algorithm, we need to create a dominator tree first, and calculate DF, and these processes are needed.
Do you feel that it requires a lot of resources?
As time passed, in 2013, Braun published a paper improving this algorithm.
Braun’s Algorithm
Simple and Efficient Construction of Static Single Assignment Form
Matthias Braun1, Sebastian Buchwald1, Sebastian Hack2, Roland Leißa2, Christoph Mallon2, and Andreas Zwinkau
https://pp.ipd.kit.edu/uploads/publikationen/braun13cc.pdfThis paper was published in 2013 by Matthias Braun et al. at the Karlsruhe Institute of Technology.
As we saw in the commit earlier, this is the algorithm used in React Compiler.
Add SSA-ify pass · react/react@379251c
The algorithm is described in detail here: https://pp.info.uni-karlsruhe.de/uploads/publikationen/braun13cc.pdf Note that the SSA form generated is not minimal. A follow on RedundantPhiElimina...
https://github.com/facebook/react/commit/379251c65f39039ace1d2e5a80bdb5938cf3427cDuring the Q&A session at React Conf 2024, it was mentioned that Meta had recruited many compiler experts for compiler development.
We can find on LinkedIn that the author of this paper, Braun, has been working as a Compiler Engineer at Meta since 2018.
Matthias Braun
No description available
https://www.linkedin.com/in/matthias-braun-6b5Braun’s algorithm has several important improvements compared to Cytron’s algorithm:
- Unlike Cytron’s algorithm, there’s no need to pre-calculate the dominator tree or dominance frontier.
- It can directly convert from abstract syntax tree (AST) or bytecode to SSA form.
- There’s no need to recalculate the SSA form every time the code is modified.
The main steps of Braun’s algorithm are as follows:
- Local Variable Numbering: The process of tracking the definition and use of variables within a single basic block. The main purpose is to remove duplicate calculations and perform local optimization.
- Global Variable Numbering: The process of tracking the definition and use of variables within the entire control flow graph (CFG), beyond a single basic block.
Local Variable Numbering
function foo() {
  let x = 0;
  if (x > 3) {
    x = 5;
  } else {
    x = 10;
  }
  let y = x + 2;
}
Let’s look at the progress using this example code.
This code will be divided into two blocks in the middle due to the conditional statement.
So when converted to HIR, it will be transformed like this. (This time, let’s look at the HIR, which is the compiler’s intermediate result)
function foo
bb0 (block):
  [1] $0 = 0
  [2] $2 = StoreLocal Let x$1 = $0
  [3] $7 = LoadLocal x$1
  [4] $8 = 3
  [5] $9 = Binary $7 > $8
  [6] If ($9) then:bb2 else:bb3 fallthrough=bb1
bb2 (block):
  predecessor blocks: bb0
  [7] $3 = 5
  [8] $4 = StoreLocal Reassign x$1 = $3
  [9] Goto bb1
bb3 (block):
  predecessor blocks: bb0
  [10] $5 = 10
  [11] $6 = StoreLocal Reassign x$1 = $5
  [12] Goto bb1
bb1 (block):
  predecessor blocks: bb2 bb3
  [13] $10 = LoadLocal x$1
  [14] $11 = 2
  [15] $12 = Binary $10 + $11
  [16] $14 = StoreLocal Let y$13 = $12
  [17] $15 = <undefined>
  [18] Return $15
We can see that it’s divided into bb0 before the branch, bb2 which is the then block of if, bb3 which is the else block, and bb1 after the branch.
First, let’s perform local variable numbering for each block.
In the existing HIR, they’re commonly using a variable called x$1.
Now we need to convert this to a new variable for each block. At this point, we track the definition def and use of each variable.
When the definition and use are in the same block, we assign a new local value.
In bb0, since definition StoreLocal and use LoadLocal are in the same block, we assign a new local value x_1.
In bb2, since StoreLocal and Reassign are in the same block, we assign a local value x_2.
Similarly in bb3, we assign a local value x_3.
x in bb0 is converted to x_1, x in bb2 to x_2, and x in bb3 to x_3.
function foo
bb0 (block):
  [1] $0 = 0
  [2] $2 = StoreLocal Let x$1 = $0 // x$1 -> x$1
  [3] $7 = LoadLocal x$1
  [4] $8 = 3
  [5] $9 = Binary $7 > $8
  [6] If ($9) then:bb2 else:bb3 fallthrough=bb1
bb2 (block):
  predecessor blocks: bb0
  [7] $3 = 5
  [8] $4 = StoreLocal Reassign x$2 = $3 // x$1 -> x$2
  [9] Goto bb1
bb3 (block):
  predecessor blocks: bb0
  [10] $5 = 10
  [11] $6 = StoreLocal Reassign x$3 = $5 // x$1 -> x$3
  [12] Goto bb1
bb1 (block):
  predecessor blocks: bb2 bb3
  [13] $10 = LoadLocal x$1 // x$1 -> ??
  [14] $11 = 2
  [15] $12 = Binary $10 + $11
  [16] $14 = StoreLocal Let y$13 = $12
  [17] $15 = <undefined>
  [18] Return $15
But in bb1, the definition and use are not in the same block.
There’s no definition (def) part to be found, and there’s a LoadLocal (use) right away.
In this case, we can’t assign a local value. So we move on to the next step, Global Variable Numbering.
Global Variable Numbering
Global Variable Numbering is the process of tracking the definition and use of variables across the entire control flow graph (CFG), beyond the local scope.
Through this process, we find where to place phi functions.
To process y = x + 2 in bb1, we need to find the value of x. But since there’s no definition part in bb1, we need to go back and find the value of x.
From here, we recursively look for the definition of x.
At the top of the block, you can see things like this:
bb1 (block):
  predecessor blocks: bb2 bb3
These are the predecessors, through which we go up to the previous block.
How can we find these predecessors?
As you can see in the graph above, the previous blocks become the predecessors.
If there had been only one predecessor, we would have easily found the definition of x in the previous block.
But in the case of bb1, it has two predecessors, bb2 and bb3. We need to find the definition of x in these two blocks.
Let’s look at each block.
There’s a definition of x_2 in bb2, and a definition of x_3 in bb3.
This means that bb1 can also be seen as a point where branches merge!
Then let’s confidently place a phi function in bb1.
bb1 (block):
  predecessor blocks: bb2 bb3
  x$4: phi(bb2: x$2, bb3: x$3) // phi 함수 추가
  [14] $10 = LoadLocal x$4 // x$1 -> x$4
  [15] $11 = 2
  [16] $12 = Binary $10 + $11
  [17] $14 = StoreLocal Let y$13 = $12
  [18] $15 = <undefined>
  [19] Return $15
By adding the phi function like this, we’ve successfully overcome one of the hurdles of SSA transformation, placing a phi function at the point where branches merge.
It’s simpler than you thought, right? 🤓
Apart from this process, there are more processes for optimizing phi functions, but knowing this much allows us to understand the core of Braun’s algorithm’s SSA transformation.\
By looking at these two papers, we’ve essentially grasped the core of SSA transformation.
Now let’s look at the SSA transformation of React Compiler!
React Compiler’s SSA Transformation
Let’s bring out the runWithEnvirionment function in Pipeline.ts that we started looking at in the previous article.
// packages/babel-plugin-react-compiler/src/Entrypoint/Pipline.ts
function* runWithEnvironment(
  func: NodePath<
    t.FunctionDeclaration | t.ArrowFunctionExpression | t.FunctionExpression
  >,
  env: Environment
): Generator<CompilerPipelineValue, CodegenFunction> {
  const hir = lower(func, env).unwrap();
  // ...
  enterSSA(hir);
  // ...
}
lower After going through some optimization processes, it starts the HIR to SSA conversion through the enterSSA function.
So let’s look at the SSA conversion process through the enterSSA function!
export default function enterSSA(func: HIRFunction): void {
  const builder = new SSABuilder(func.env, func.body.blocks);
  enterSSAImpl(func, builder, func.body.entry);
}
The SSABuilder is created with the HIRFunction created in the previous process, and the SSA conversion is started through the enterSSAImpl function.
SSABuilder has several methods that help with SSA conversion.
Let’s introduce the detailed methods through the conversion process.
function enterSSAImpl(
  func: HIRFunction,
  builder: SSABuilder,
  rootEntry: BlockId
): void {
  const visitedBlocks: Set<BasicBlock> = new Set();
  for (const [blockId, block] of func.body.blocks) {
    // ... SSA 변환 과정
  }
}
The enterSSAImpl function visits all blocks starting from the rootEntry.
It will visit the blocks one by one through the for loop, and this is when the SSA conversion takes place.
Starting with the visitedBlocks Set, it seems that there will be parts that need validation for revisits.
for (const [blockId, block] of func.body.blocks) {
  CompilerError.invariant(!visitedBlocks.has(block), {
    reason: `found a cycle! visiting bb${block.id} again`,
    description: null,
    loc: null,
    suggestions: null,
  });

  visitedBlocks.add(block);
  // ...
}
If it revisits a block that has already been visited, it’s a case where there’s a loop, so it terminates with an error.
If not, it adds to visitedBlocks and starts the SSA conversion.
Initialization
for (const [blockId, block] of func.body.blocks) {
  // ...
  builder.startBlock(block);
}

// SSABuilder
class SSABuilder {
  #states: Map<BasicBlock, State> = new Map();
  #current: BasicBlock | null = null;
  // ...

  startBlock(block: BasicBlock): void {
    this.#current = block;
    this.#states.set(block, {
      defs: new Map(),
      incompletePhis: [],
    });
  }
}
The current block and the state for the block are initialized through the builder using the startBlock method.
Parameter Processing
As we’ve seen before, the compiler’s compilation unit is done on a function-by-function basis.
Then we’ll need to process the parameters, which are the starting part of the function, right?
for (const [blockId, block] of func.body.blocks) {
  // ...
  if (blockId === rootEntry) { // if it's the rootEntry
    func.params = func.params.map((param) => {
      // case of general parameters, a, b, c in foo(a, b, c)
      if (param.kind === "Identifier") {
        return builder.definePlace(param);
      } else {
        // case of Spread parameters, ...rest in foo(...rest)
        return {
          kind: "Spread",
          place: builder.definePlace(param.place),
        };
      }
    });
  }
  // ...
}
In the case of rootEntry, the function parameters are redefined through the builder’s definePlace.
class SSABuilder {
  // ...
  definePlace(oldPlace: Place): Place {
    const oldId = oldPlace.identifier;
    const newId = this.makeId(oldId);
    this.state().defs.set(oldId, newId);
    return {
      ...oldPlace,
      identifier: newId,
    };
  }
  // ...
  makeId(oldId: Identifier): Identifier {
    return {
      id: this.nextSsaId,
      name: oldId.name,
      mutableRange: {
        start: makeInstructionId(0),
        end: makeInstructionId(0),
      },
      scope: null, // reset along w the mutable range
      type: makeType(),
      loc: oldId.loc,
    };
  }
  get nextSsaId(): IdentifierId {
    return this.#env.nextIdentifierId;
  }
}
At this time, the existing identifier is made into a new identifier through the makeId method.
In the case of id, it’s fetched newly through a getter called next.SsaId, but
It gets a new id through Environment’s nextIdentifierId, which is managed globally.
In other words, a new id will be assigned globally, not assigning a new id at the SSA level.
If it used up to 10 in the previous process (lowering process), new ids will be assigned from 11 through the SSA conversion.
// Environment.ts
makeIdentifierId(id: number): IdentifierId {
  return id as IdentifierId;
}

class Environment {
  get nextIdentifierId(): IdentifierId {
    return makeIdentifierId(this.#nextIdentifer++);
  }
}
There was an interesting skill personally, which was to return a new id through the getter and raise the id by one through the postfix increment operator.
This method of id management could be good to use when managing modals too.
Instruction Conversion
The next step is to convert the instructions.
Let’s look at the conversion process here along with example code.
function foo() {
  let y = 333;

  if (y > 1) {
    y = 111;
  } else {
    y = 222;
  }

  let x = y;
}
This code will be transformed into HIR form as follows:
function foo
bb0 (block):
  [1] $0 = 333
  [2] $2 = StoreLocal Let y$1 = $0
  [3] $7 = LoadLocal y$1
  [4] $8 = 1
  [5] $9 = Binary $7 > $8
  [6] If  $9) then:bb2 else:bb3 fallthrough=bb1
bb2 (block):
  predecessor blocks: bb0
  [7] $3 = 111
  [8] $4 = StoreLocal Reassign y$1 = $3
  [9] Goto bb1
bb3 (block):
  predecessor blocks: bb0
  [10] $5 = 222
  [11] $6 = StoreLocal Reassign y$1 = $5
  [12] Goto bb1
bb1 (block):
  predecessor blocks: bb2 bb3
  [13] $10 = LoadLocal y$1
  [14] $12 = StoreLocal Let x$11 = $10
  [15] $13 = <undefined>
  [16] Return $13
bb0~3 are divided into units called block, and each block consists of instruction and terminal.
In the case of bb0, it consists of a total of 5 Instructions and 1 Terminal as follows:
// Instruction
[1] $0 = 333
[2] $2 = StoreLocal Let y$1 = $0
[3] $7 = LoadLocal y$1
[4] $8 = 1
[5] $9 = Binary $7 > $8

// Terminal
[6] If  $9) then:bb2 else:bb3 fallthrough=bb1
It’s expressed in types like this
// HIR.ts
export type BasicBlock = {
  kind: BlockKind;
  id: BlockId;
  instructions: Array<Instruction>; // Instruction
  terminal: Terminal;  // Terminal
  preds: Set<BlockId>;
  phis: Set<Phi>;
};
Each instruction has the following type:
The instruction is composed of left-hand value (lvalue) = right-hand value (value).
export type Instruction = {
  id: InstructionId;    // unique identifier of the instruction
  lvalue: Place;        // location where the result is stored
  value: InstructionValue; // actual value/operation of the instruction
  loc: SourceLocation;  // location in the original source code
};
Let’s check with a few instructions:
// [1] $0 = 333
{
  id: 1,
  lvalue: {
    kind: "Identifier",
    identifier: { id: 0, ... }, ...
  },
  value: { kind: "Primitive", value: 333, ... },
  loc,
}
// [2] $2 = StoreLocal Let y$1 = $0
{
  id: 2,
  lvalue: {
    kind: "Identifier",
    identifier: { id: 2, ... }, ...
  },
  value: {
    kind: "StoreLocal",
    lvalue: {
      kind: "Let",
      place: {
        kind: "Identifier",
        identifier: { id: 1, name: { value: "y"}, ... }, ...
      },
    },
    value: {
      kind: "Identifier",
      identifier: { id: 0, ... }, ...
    },
  },
}
In the case of instruction [1], it’s in the simplest form with an identifier on the left side and a Primitive on the right side.
In the case of [2], it’s a bit more complex, with an identifier on the left side and a StoreLocal on the right side.
At this time, StoreLocal also consists of left and right sides.
Let y$1 goes into the left side, and identifier goes into the right side.
Now let’s look at the conversion process!
It visits the instructions of the block one by one.
for (const instr of block.instructions) {
  mapInstructionOperands(instr, (place) => builder.getPlace(place));
  mapInstructionLValues(instr, (lvalue) => builder.definePlace(lvalue));
  // ...
}
For each instruction, it converts the operand and lvalue through mapInstructionOperands and mapInstructionLValues.
operand corresponds to the right side of the instruction, and lvalue corresponds to the left side of the instruction.
In the case of left-hand side (LValue), because it’s where the value is written, it’s converted through definePlace which we looked at earlier that assigns a new id.
In the case of right-hand side (OPerands), because it’s where the value is referenced, it’s converted through getPlace.
Let’s look at getPlace to see through what process it fetches the value.
It’s fetching the id through getIdAt. Then let’s look at getIdAt.
class SSABuilder {
  getPlace(oldPlace: Place): Place {
    const newId = this.getIdAt(oldPlace.identifier, this.#current!.id);
    return {
      ...oldPlace,
      identifier: newId,
    };
  }
  getIdAt(oldId: Identifier, blockId: BlockId): Identifier {
    // check if Place is defined locally
    const block = this.#blocks.get(blockId)!;
    const state = this.#states.get(block)!;

    if (state.defs.has(oldId)) {
      return state.defs.get(oldId)!;
    }

    if (block.preds.size == 0) {
      /*
       * We're at the entry block and haven't found our defintion yet.
       * console.log(
       *   `Unable to find "${printIdentifier(
       *     oldId
       *   )}" in bb${blockId}, assuming it's a global`
       * );
       */
      this.#unknown.add(oldId);
      return oldId;
    }

    if (this.unsealedPreds.get(block)! > 0) {
      /*
       * We haven't visited all our predecessors, let's place an incomplete phi
       * for now.
       */
      const newId = this.makeId(oldId);
      state.incompletePhis.push({ oldId, newId });
      state.defs.set(oldId, newId);
      return newId;
    }

    // Only one predecessor, let's check there
    if (block.preds.size == 1) {
      const [pred] = block.preds;
      const newId = this.getIdAt(oldId, pred);
      state.defs.set(oldId, newId);
      return newId;
    }
    // There are multiple predecessors, we may need a phi.
    const newId = this.makeId(oldId);
    /*
     * Adding a phi may loop back to our block if there is a loop in the CFG.  We
     * update our defs before adding the phi to terminate the recursion rather than
     * looping infinitely.
     */
    state.defs.set(oldId, newId);
    return this.addPhi(block, oldId, newId);
  }
}
getIdAt fetches the id in several cases.
Let’s look at them one by one.
- If oldId is defined in the current block, return that id.
if (state.defs.has(oldId)) {
  return state.defs.get(oldId)!;
}
When we issued a new id in definePlcae earlier, we stored the id pair of state’s defs.
At this time, if oldId is defined, it returns that id.
definePlace(oldPlace: Place): Place {
  const oldId = oldPlace.identifier;
  const newId = this.makeId(oldId);
  this.state().defs.set(oldId, newId); // save with new id
  return {
    ...oldPlace,
    identifier: newId,
  };
}- In the case of the entry block, if the id is not found, it’s considered global and returned.
if (block.preds.size == 0) {
  this.#unknown.add(oldId);
  return oldId;
}
In the case of the entry block, because there are no preds, it’s considered global and returned.
preds means predecessor. Doesn’t it sound familiar?
We saw in Braun’s algorithm earlier that we go up to the previous block through the predecessor.
- If there are remaining predecessors, it adds an incomplete phi.
if (this.unsealedPreds.get(block)! > 0) {
  const newId = this.makeId(oldId);
  state.incompletePhis.push({ oldId, newId });
  state.defs.set(oldId, newId);
  return newId;
}
We haven’t looked at the unsealed concept yet, so let’s skip it for now.
We haven’t looked at the unsealed concept yet, so let’s skip it for now.
if (block.preds.size == 1) {
  const [pred] = block.preds;
  const newId = this.getIdAt(oldId, pred);
  state.defs.set(oldId, newId);
  return newId;
}
If there’s only one predecessor, we need to search the previous block without hesitation, at this time it searches recursively.
- If there are multiple predecessors, it adds a phi function.
const newId = this.makeId(oldId);
state.defs.set(oldId, newId);
return this.addPhi(block, oldId, newId);
In Braun’s algorithm that we looked at earlier, we saw that when there are multiple predecessors, we add a phi function in that block.
This is exactly that implementation part! 🤓
It’s implemented as we saw in the paper.
Then let’s look at how the addPhi function adds the phi function.
addPhi(block: BasicBlock, oldId: Identifier, newId: Identifier): Identifier {
  const predDefs: Map<BlockId, Identifier> = new Map();
  for (const predBlockId of block.preds) {
    const predId = this.getIdAt(oldId, predBlockId);
    predDefs.set(predBlockId, predId);
  }

  const phi: Phi = {
    kind: "Phi",
    id: newId,
    operands: predDefs,
    type: makeType(),
  };

  block.phis.add(phi);
  return newId;
}
It creates predDefs as a Map composed of blockId and identifier to hold the previously defined ones.
It iterates through the predecessors of the current block block.preds and recursively finds the id through getIdAt and stores it in predDefs.
With the obtained predDefs, it creates a phi and adds it to block.phis.
Function Expression, Object Method Processing
if (
  instr.value.kind === "FunctionExpression" ||
  instr.value.kind === "ObjectMethod"
) {
  const loweredFunc = instr.value.loweredFunc.func;
  const entry = loweredFunc.body.blocks.get(loweredFunc.body.entry)!;
  builder.defineFunction(loweredFunc);
  builder.enter(() => {
    loweredFunc.context = loweredFunc.context.map((p) =>
      builder.getPlace(p)
    );
    loweredFunc.params = loweredFunc.params.map((param) => {
      if (param.kind === "Identifier") {
        return builder.definePlace(param);
      } else {
        return {
          kind: "Spread",
          place: builder.definePlace(param.place),
        };
      }
    });
    enterSSAImpl(loweredFunc, builder, rootEntry);
  });
}
In the case of FunctionExpression and ObjectMethod, because they are nested functions, they perform SSA conversion again recursively through enterSSAImpl.
Terminal Processing
mapTerminalOperands(block.terminal, (place) => builder.getPlace(place));In the case of terminal, it’s cases like these.
[6] If  $9) then:bb2 else:bb3 fallthrough=bb1 // $9
[9] Goto bb1
[12] Goto bb1
[16] Return $13  // $13
In this case, there are cases where other elements (13) are referenced, so it finds the id and converts it.
Final Comparison
Up to here, it performs static single assignment (SSA) for all elements that make up HIR. The example code from earlier will be transformed into this form:
function foo
bb0 (block):
  [1] $14 = 333
  [2] $16 = StoreLocal Let y$15 = $14
  [3] $17 = LoadLocal y$15
  [4] $18 = 1
  [5] $19 = Binary $17 > $18
  [6] If  $19) then:bb2 else:bb3 fallthrough=bb1
bb2 (block):
  predecessor blocks: bb0
  [7] $20 = 111
  [8] $22 = StoreLocal Reassign y$21 = $20
  [9] Goto bb1
bb3 (block):
  predecessor blocks: bb0
  [10] $23 = 222
  [11] $25 = StoreLocal Reassign y$24 = $23
  [12] Goto bb1
bb1 (block):
  predecessor blocks: bb2 bb3
  y$26: phi(bb2: y$21, bb3: y$24)
  [13] $27 = LoadLocal y$26
  [14] $29 = StoreLocal Let x$28 = $27
  [15] $30 = <undefined>
  [16] Return $30
It’s difficult to compare with the eyes, so let’s compare through diff!
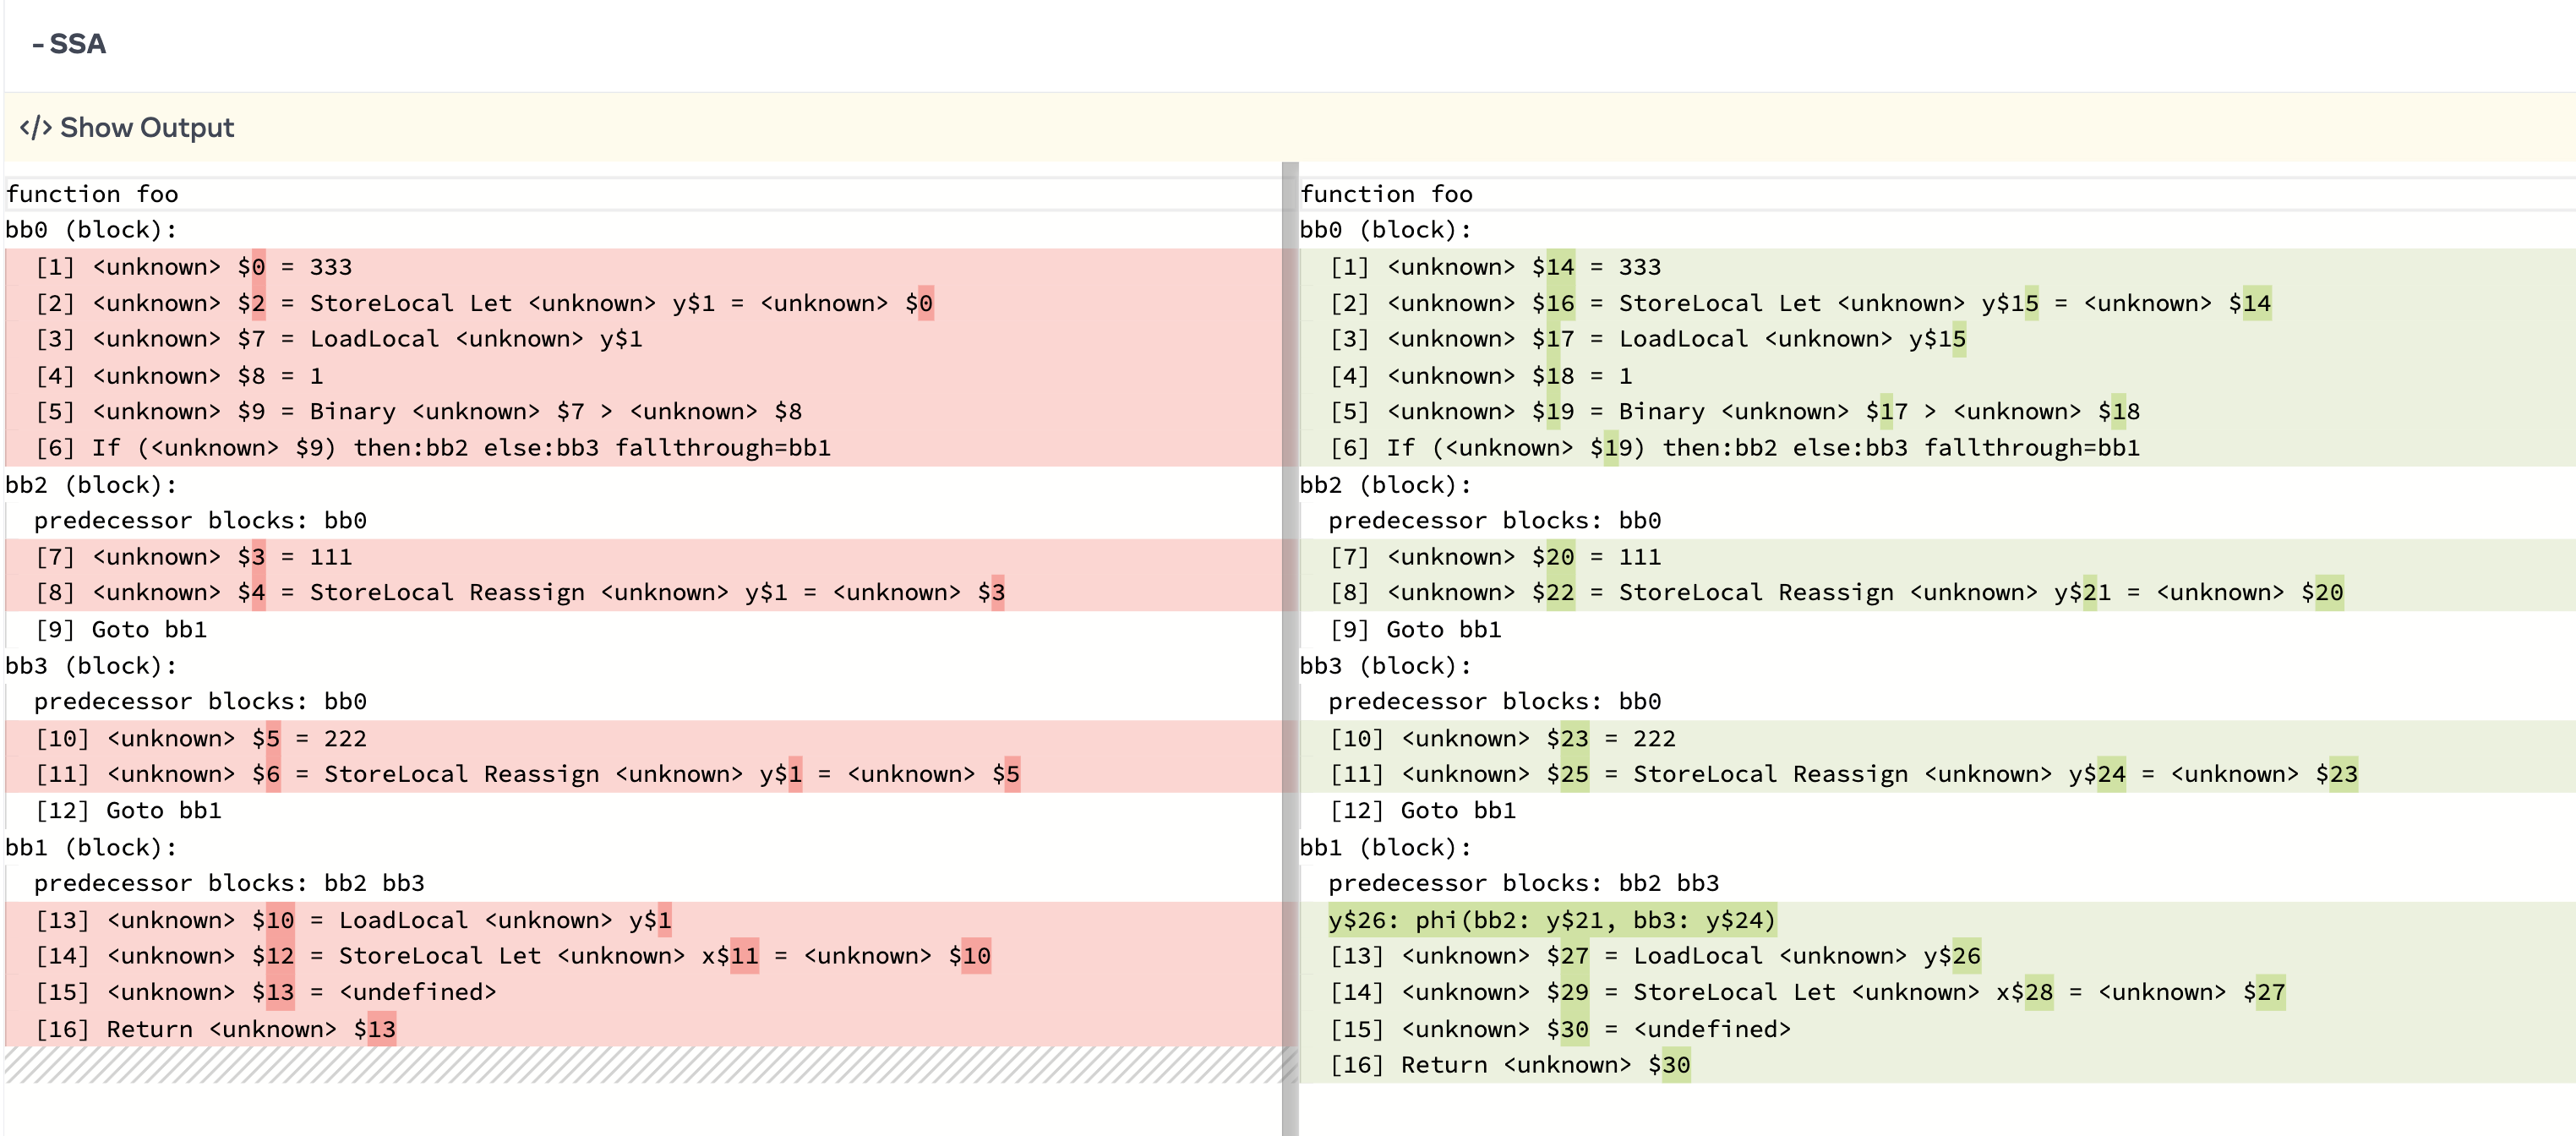
We can see that all the values of y have been converted to individual values, and a phi function has been added.
Loop Processing (Advanced)
You can understand what the SSA conversion process is like just by looking at the process above, so it’s okay to skip.
But if we go deeper, we need to handle loops.
function foo() {
  let x = 1;
  for (let i = 0; i < 10; i++) {
    x += 1;
  }
  return x;
}Let’s look at code with a for loop like this.
The conditional statements we’ve looked at so far had a relatively intuitive flow from top to bottom.
In most cases, it was merging below from the branch of the upper block.
But in the case of loops, there are cases where it goes back up again (back edge).
How should we handle these cases?
First, let’s convert to HIR first.
function foo
bb0 (block):
  [1] $0 = 1
  [2] $2 = StoreLocal Let x$1 = $0
  [3] For init=bb3 test=bb1 loop=bb5 update=bb4 fallthrough=bb2
bb3 (loop):
  predecessor blocks: bb0
  [4] $3 = 0
  [5] $5 = StoreLocal Let i$4 = $3
  [6] Goto bb1
bb1 (loop):
  predecessor blocks: bb3 bb4
  [7] $12 = LoadLocal i$4
  [8] $13 = 10
  [9] $14 = Binary $12 < $13
  [10] Branch (<unknown> $14) then:bb5 else:bb2
bb5 (block):
  predecessor blocks: bb1
  [11] $7 = LoadLocal x$1
  [12] $8 = 1
  [13] $9 = Binary $7 + $8
  [14] $10 = StoreLocal Reassign x$1 = $9
  [15] $11 = LoadLocal x$1
  [16] Goto(Continue) bb4
bb4 (loop):
  predecessor blocks: bb5
  [17] $6 = PostfixUpdate i$4 = i$4 ++
  [18] Goto bb1
bb2 (block):
  predecessor blocks: bb1
  [19] $15 = LoadLocal x$1
  [20] Return $15
Let’s draw the CFG for easier understanding.
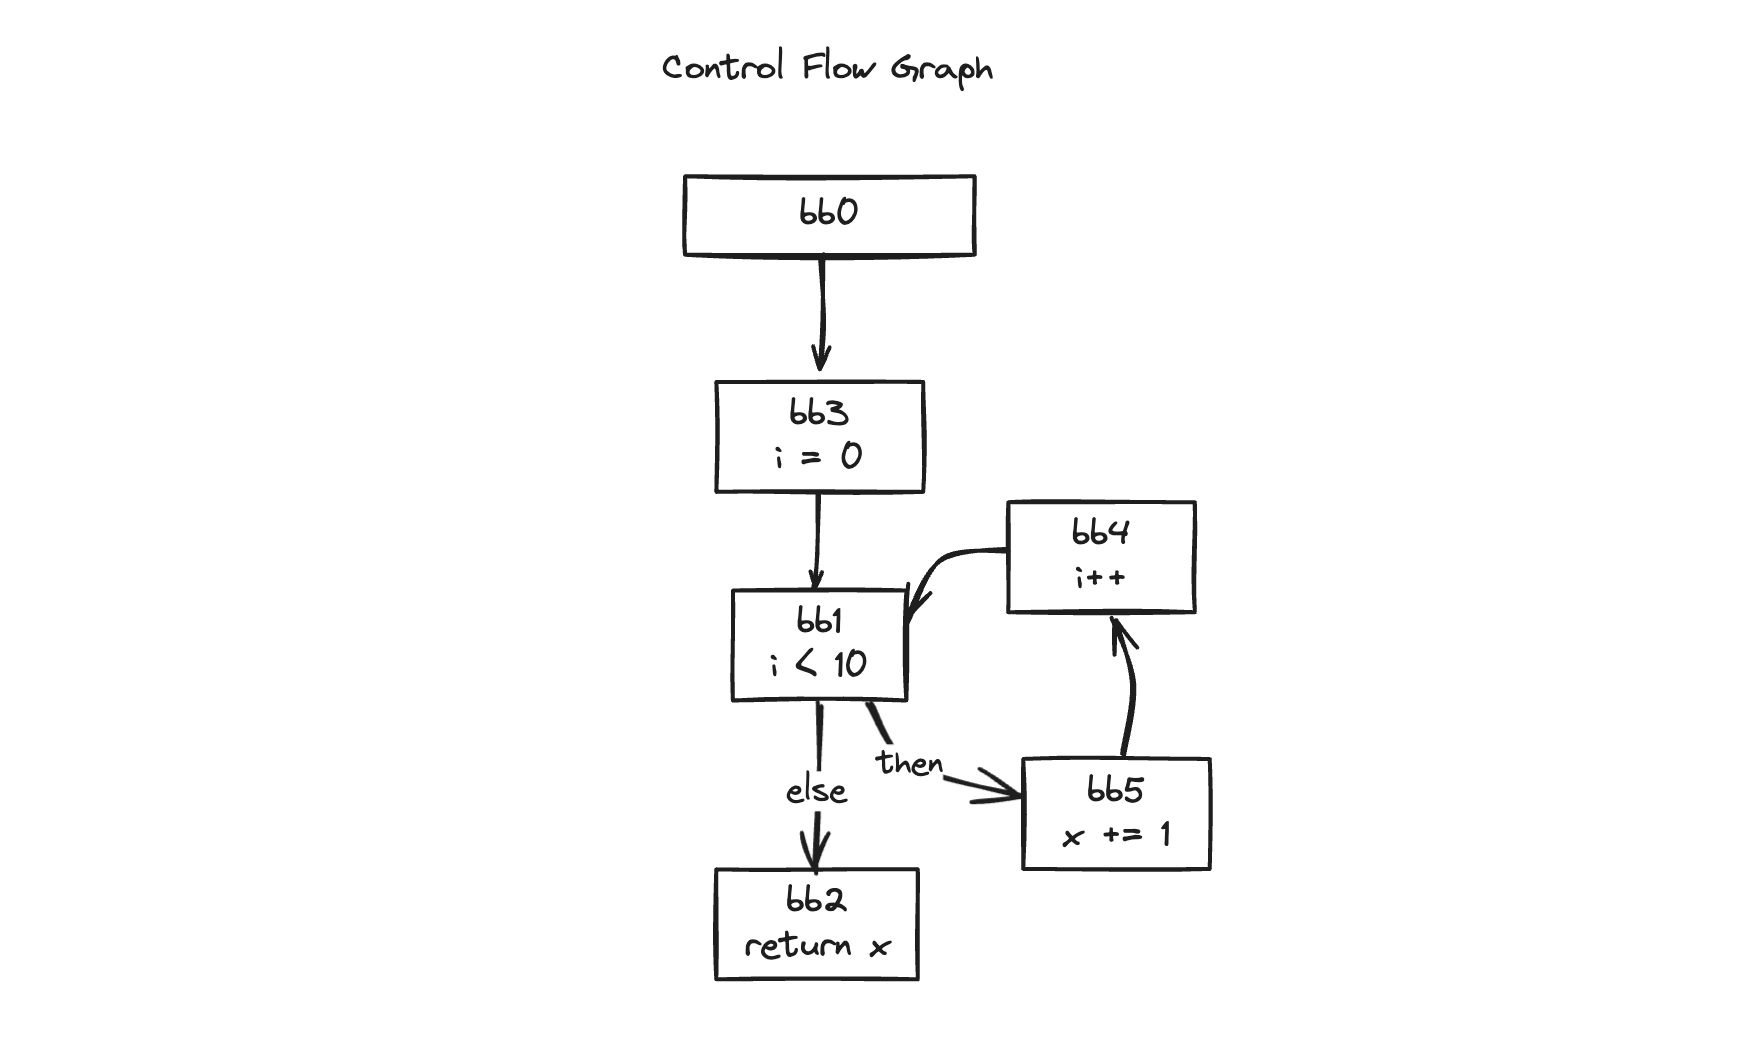
We’re supposed to place phi functions at the point where branches merge, aren’t we?
Then it seems we should place a phi function in bb1, which merges from bb3 and bb4.
Coincidentally, when we look at the bb1 block, the predecessor is also given. Then can we go up to the previous block through the recursive method we looked at earlier?
But this case is different.
There’s one process we’ve skipped after handling the terminal.
There’s a process for terminal successor. It’s the processing of the terminal successor block.
The terminal successor block means the subsequent block for that instruction in case there are instructions like If, Goto, for in the case of terminal.
In the case of an if statement, it’s divided into then(consequent) and else(alternate), and in the case of a for statement, it’s defined as subsequent blocks like init, test, loop, update.
mapTerminalOperands(block.terminal, (place) => builder.getPlace(place));
for (const outputId of eachTerminalSuccessor(block.terminal)) {
    const output = func.body.blocks.get(outputId)!;

    let count;
    if (builder.unsealedPreds.has(output)) {
      count = builder.unsealedPreds.get(output)! - 1;
    } else {
      count = output.preds.size - 1;
    }
    builder.unsealedPreds.set(output, count);

    if (count === 0 && visitedBlocks.has(output)) {
      builder.fixIncompletePhis(output);
    }
  }
For the subsequent blocks, it counts the number of predecessors (preds) of that block.
If it’s a block that’s being scanned for the first time, it puts the number of predecessors in count and stores it in unsealedPreds.
count = output.preds.size - 1;
builder.unsealedPreds.set(output, count);
If it’s a subsequent block that’s already been scanned, it subtracts one from the count that was set earlier.
count = builder.unsealedPreds.get(output)! - 1;If that count becomes 0 and it’s a block that’s already been visited, it means all predecessors have been visited.
At this time, it adds a phi function through fixIncompletePhis.
To help understanding, let’s look at how it’s processed in the order of blocks through the above example.
1. bb0
[3] For init=bb3 test=bb1 loop=bb5 update=bb4 fallthrough=bb2In the case of bb0, the subsequent block of the For statement becomes bb3, which is init.
Because it’s the part where the for loop starts for the first time, it becomes the init block.
export function* eachTerminalSuccessor(terminal: Terminal): Iterable<BlockId> {
  switch(terminal.kind){
    case "for": {
      yield terminal.init;
      break;
    }
    // ...
  }
}
At this time, output, the subsequent block becomes bb3, and because bb3’s preds is bb0 1, count becomes 0.
unsealedPreds will be stored as {bb3: 0}.
At this time, because bb3 is not in visitedBlocks, fixIncompletePhis is not executed.
2. bb3
[6] Goto bb1In the case of bb3, the subsequent block of the Goto statement is bb1.
Because bb1’s preds are bb3, bb4, count becomes 1.
Let’s update unsealedPreds to {bb3: 0, bb1: 1}.
3. bb1
Before handling the terminal of bb1, it encounters a branch in the instruction handling process.
In the process of handling id through getIdAt that we looked at earlier, we encounter this conditional statement that we skipped earlier.
getIdAt(oldId: Identifier, blockId: BlockId): Identifier {
  // ...
  if (this.unsealedPreds.get(block)! > 0) {
    /*
      * We haven't visited all our predecessors, let's place an incomplete phi
      * for now.
      */
    const newId = this.makeId(oldId);
    state.incompletePhis.push({ oldId, newId });
    state.defs.set(oldId, newId);
    return newId;
  }
  // ...
}
At this time, because the count of bb1 in unsealedPreds is 1, this conditional statement becomes true.
Because it means there are remaining unsealed predecessor blocks, instead of adding a phi function right away, it adds the necessary information to incompletePhis.
Let’s continue handling the terminal
[10] Branch (<unknown> $14) then:bb5 else:bb2In the case of bb1, the subsequent blocks of the Branch statement become then(consequent):bb5, else(alternate):bb2.
case "branch": {
  yield terminal.consequent;
  yield terminal.alternate;
  break;
}
After processing in order, unsealedPreds becomes {bb3: 0, bb1: 1, bb5: 0, bb2: 0}.
Because both become 0 and bb5, bb2 are not in visitedBlocks, fixIncompletePhis is not executed.
4. bb5
[16] Goto(Continue) bb4In the case of bb5, the subsequent block of the Goto statement is bb4.
unsealedPreds becomes {bb3: 0, bb1: 1, bb5: 0, bb2: 0, bb4: 0}.
5. bb4
[18] Goto bb1In the case of bb4, the subsequent block of the Goto statement is bb1.
Because bb1 is already in unsealedPreds, it brings the previous count and subtracts 1.
unsealedPreds becomes {bb3: 0, bb1: 0, bb5: 0, bb2: 0, bb4: 0}.
At this time, because bb1 is in visitedBlocks, fixIncompletePhis is executed.
fixIncompletePhis(block: BasicBlock): void {
  const state = this.#states.get(block)!;
  for (const phi of state.incompletePhis) {
    this.addPhi(block, phi.oldId, phi.newId);
  }
}
It adds the phi function that was added to incompletePhis in bb1 earlier.
With this, we can complete the phi function processing for loops as well.
Finally, Let’s take a look at the result.
function foo
bb0 (block):
  [1] $17 = 1
  [2] $19 = StoreLocal Let x$18 = $17
  [3] For init=bb3 test=bb1 loop=bb5 update=bb4 fallthrough=bb2
bb3 (loop):
  predecessor blocks: bb0
  [4] $20 = 0
  [5] $22 = StoreLocal Let i$21 = $20
  [6] Goto bb1
bb1 (loop):
  predecessor blocks: bb3 bb4
  i$23: phi(bb3: i$21, bb4: i$34) // phi function added
  x$27: phi(bb3: x$18, bb4: x$31) // phi function added
  [7] $24 = LoadLocal i$23
  [8] $25 = 10
  [9] $26 = Binary $24 < $25
  [10] Branch (<unknown> $26) then:bb5 else:bb2
bb5 (block):
  predecessor blocks: bb1
  [11] $28 = LoadLocal x$27
  [12] $29 = 1
  [13] $30 = Binary $28 + $29
  [14] $32 = StoreLocal Reassign x$31 = $30
  [15] $33 = LoadLocal x$31
  [16] Goto(Continue) bb4
bb4 (loop):
  predecessor blocks: bb5
  [17] $35 = PostfixUpdate i$34 = i$23 ++
  [18] Goto bb1
bb2 (block):
  predecessor blocks: bb1
  [19] $36 = LoadLocal x$27
  [20] Return $36
We can see that phi functions have been added at appropriate positions.
Conclusion
In this article, we looked at the SSA transformation process of React Compiler.
SSA transformation is a concept of Static Single Assignment, which means that assignment to a variable occurs only once.
In this process, we introduced the concept of phi function to handle branches, and we looked at how to add phi functions.
Through this, we can track where assignments to variables occurred, which also helps with optimization.
In the process, we looked at two papers:
We examined the processing of Cytron’s algorithm and Braun’s algorithm and their respective advantages and disadvantages.
And we looked at the SSA transformation process of React Compiler, which was our original purpose.
In the next article, we’ll look at what optimizations are performed through this SSA form that we’ve transformed. 🚀